
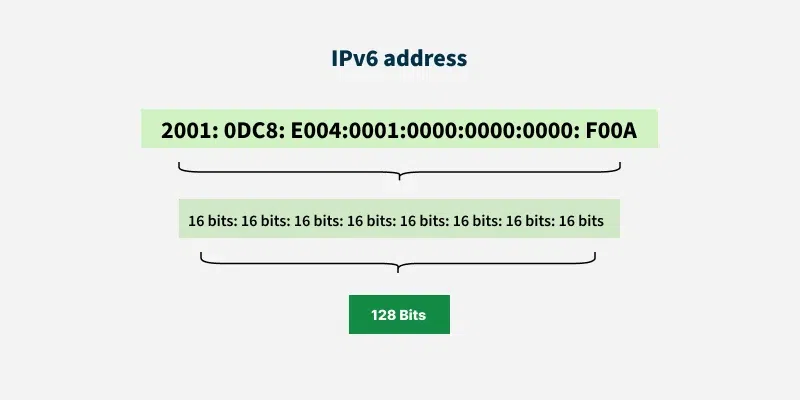
IPv6 is the newest generation of the Internet Protocol, which allows devices to access the Internet at faster speeds, in more secure ways, and to utilize a larger IP address space. While generally safe and useful, there are some reasons that a user might disable IPv6 usage. Hence, this can be either if a VPN does not work, to enhance gaming, or to troubleshoot network issues, to ensure that older software will continue to function with their system, to comply with specific security protocols, or to troubleshoot problems with the ISP and other routers. The only disadvantage of disabling IPv6 is that it may be necessary in some scenarios, but in others it isn’t. This guide explains the steps on how to turn off IPv6 on various platforms using simple steps.
How to Turn Off IPv6 on Windows 11 & Windows 10
Step 1: Open the Network Connections Settings
Click on the “Logon to the Control Panel window in Windows. Now click Network and Internet, then on Network and Sharing Center. Select “Change adapter settings,” and a list of all network devices connected to the internet will appear.
Step 2: Select Your Active Network Adapter
Check to see which network you are connected to (WiFi/ Ethernet). Hold the right-click button down, and from the pop-up menu select Properties. While you click your right button, select Properties from the pop-up menu. This will display a pop-up where you select a Network setting.
Step 3: Disable the IPv6 Option
On the list of connection items will be found a line for Internet Protocol Version 6 (TCP/IPv6). Click to make sure that IPv6 is disabled. If performing any other set-up, ensure that you’re aware of the changes you’re making.
Step 4: Save the Changes
Remove the “off” from the box for IPv6, and press OK to save. The new network settings will take several seconds to change in Windows. The Internet access could drop in and out of the network.
Step 5: Restart Your Computer
Restart the computer to be certain of the complete implementation of the changes. After your system has restarted, you should now turn off IPv6. You can now check your network connection and see if it works well.
Quick Tutorial on How to Turn Off IPv6 on macOS?
When you lease IPv6 addresses, it is important to learn how to disable the system. Let’s explain it in detail below:
Step 1: Open Network Settings
Choose the option of System Preferences or System Settings from the Apple Menu at the top left of the screen. Now choose the option of network to view all network connections and available services.
Step 2: Choose Your Active Network Connection
From the left side panel, choose the network whose IP address you want to share with others. At the left side panel, look for the network you have been connected with: WiFi or Ethernet. Verify it lists as “yes”, and then move forward to make the next change.
Step 3: Open Advanced Network Options
Click on the Details or Advanced button for your chosen network. Additionally, you will see a new settings window with several tabs from which you can configure connections, including the settings for IPv6.
Step 4: Disable IPv6 Configuration
On the Configure IPv6 tab, find the Configure IPv6 option. For macOS, there are different settings: Edit: Link-local only or off.
Step 5: Apply and Confirm Changes
Click OK, then Apply to store the changes. Your Mac may momentarily update the network connection. You should now be able to turn off IPv6 and continue to use the internet via IPv4.Unfortunately, you should have turned off IPv6 and used the internet via IPv4.
Steps for How to Turn Off IPv6 on Your Router?
When you buy an IPv6 address it is important to learn how to disable the system. Let’s explain it in detail below:
Step 1: Log in to Your Router Dashboard
Go to a web browser and enter the IP address you are given, typically 192.168.1.1 or 192.168.0.1. Please log in to the router’s settings page with the username and password you have assigned to the router.
Step 2: Find the IPv6 Settings Section
Upon logging in, scan through the menu for Advanced Settings, Network Settings, or IPv6. The location of the router menu depends upon the brand, so check in the tutorials for that brand.
Step 3: Disable the IPv6 Feature
On the IPv6 settings page, look for the Disabled or Turn Off IPv6 switch. Select Disable, Off, or IPv4 Only based on your router’s configuration.
Step 4: Save the Router Changes
After the mode of IPv6 is turned off, click Save, Apply, or Update to save the modification. Hence, you may have to wait a minute for the router to agree to the new settings and update the network settings.
Step 5: Restart the Router and Test Connection
You should restart your router and make the change, if necessary. Once the router reconnects, set it to check the internet on your device to make sure everything worked, and IPv6 was disabled.
Upgrade Network with Premium Solutions from IPV4 TradeHub
Looking for trustworthy IPv4 resources to use in hosting, proxies, VPN, or enterprise networking? Access highly secure leasing, buying as well as leasing services by IPV4 TradeHub to serve businesses of all sizes. Our expert staff makes it easy for you to get accurate ranges of IP addresses for transparent pricing, quick transfer, and committed support. On infrastructure scaling or fixing IP shortage problems, our platform provides trusted solutions, ensuring smooth and efficient operations.